Showing posts with label sewing. Show all posts

Monday, March 26, 2012

Buying Fabric, etc.

I want to make some Egg-shaped potholders for Easter, and I'm out of Insulbrite. (In case you don't know, that's a batting that is insulated and resists heat. Great for oven mitts and potholders!) I can't find it around here so I ordered it on line. But I did it in a way that saves me money. If you haven't signed up for eBates, you should. It's free, trustworthy (I've been using it for years) and it's a way to get money for buying things you'd buy anyway.

You go to the site and do a search. They do have Joanne Fabrics, and I use that a lot. (Especially with 40% off coupons!) But today I also wanted to use my Paypal account instead of my bank account to pay. So far as I've seen, Joanne's doesn't take Paypal.

I used Fabric.com, another reliable source. If you spent $35, you got free shipping. I need some bulk yarn for the fall quilt I'm making and some spring-y fabric for a new blouse. I made it to $36. I will get 4% back on that, which will go into my Paypal account. (I think the money goes in quarterly, although I'm not sure about that.)

So, things I need, free shipping and money back. And no driving an hour to a fabric/yarn store! Yeah, works for me.

https://www.fabric.com/Index.aspx

Cut-out eggs, which obviously need ironing.

Monday, February 27, 2012

Little Purses


 Here are two little purses I made based on the pattern given in the link below. They are a good way to use up scrap fabric and extra buttons. I'll probably use them as a 'giveaway' for the kids who come into the office. They are the perfect size for a little girl.


http://sewtimeless.net/?p=502

Monday, February 20, 2012

Apron

I decided I needed a new apron, since most of mine are up in the attic. Some relate to holidays and some to seasons that are not 'winter.' Here it is, in the works. Most of it is done and I should have it finished tomorrow. It's just a simple rectangle one, nothing fancy.

Tuesday, January 31, 2012

Jewelry Roll

A few posts ago I showed some 'fabric' I made by piecing scraps together. I used it to make a jewelry roll from "One Yard Wonders." Honestly, I don't have much in the way of jewelry, but it was fun to make this. Someone might get it as a gift. I think a young teenager would make good use of it, and I actually have a friend's daughter in mind. Frankly, if I were to keep it I'd use it for something else besides jewelry!

Saturday, January 28, 2012

Another Hook Holder

This one is knitted. I have to say that sewing on the felt piece was much harder, as the knit piece wanted to stretch in 80 different ways. So this is lopsided, but I don't care because it's only for me to not have to hunt through 10 hooks to find the one I want. I did find out I have 4 "K" hooks, though. Guess I don't have to buy any  more of those, LOL!
This is just a simple rectangle folded in half. The back half is all garter stitched. I did some fancier (but very easy) knitting on the front. It's in stockinette stitch, with some strands carried across the front here and there. Here's the inside:
I do have a "Q" hook that I bought from some mysterious reason which I will probably put in the back pocket.

Tuesday, January 24, 2012

More stash busting

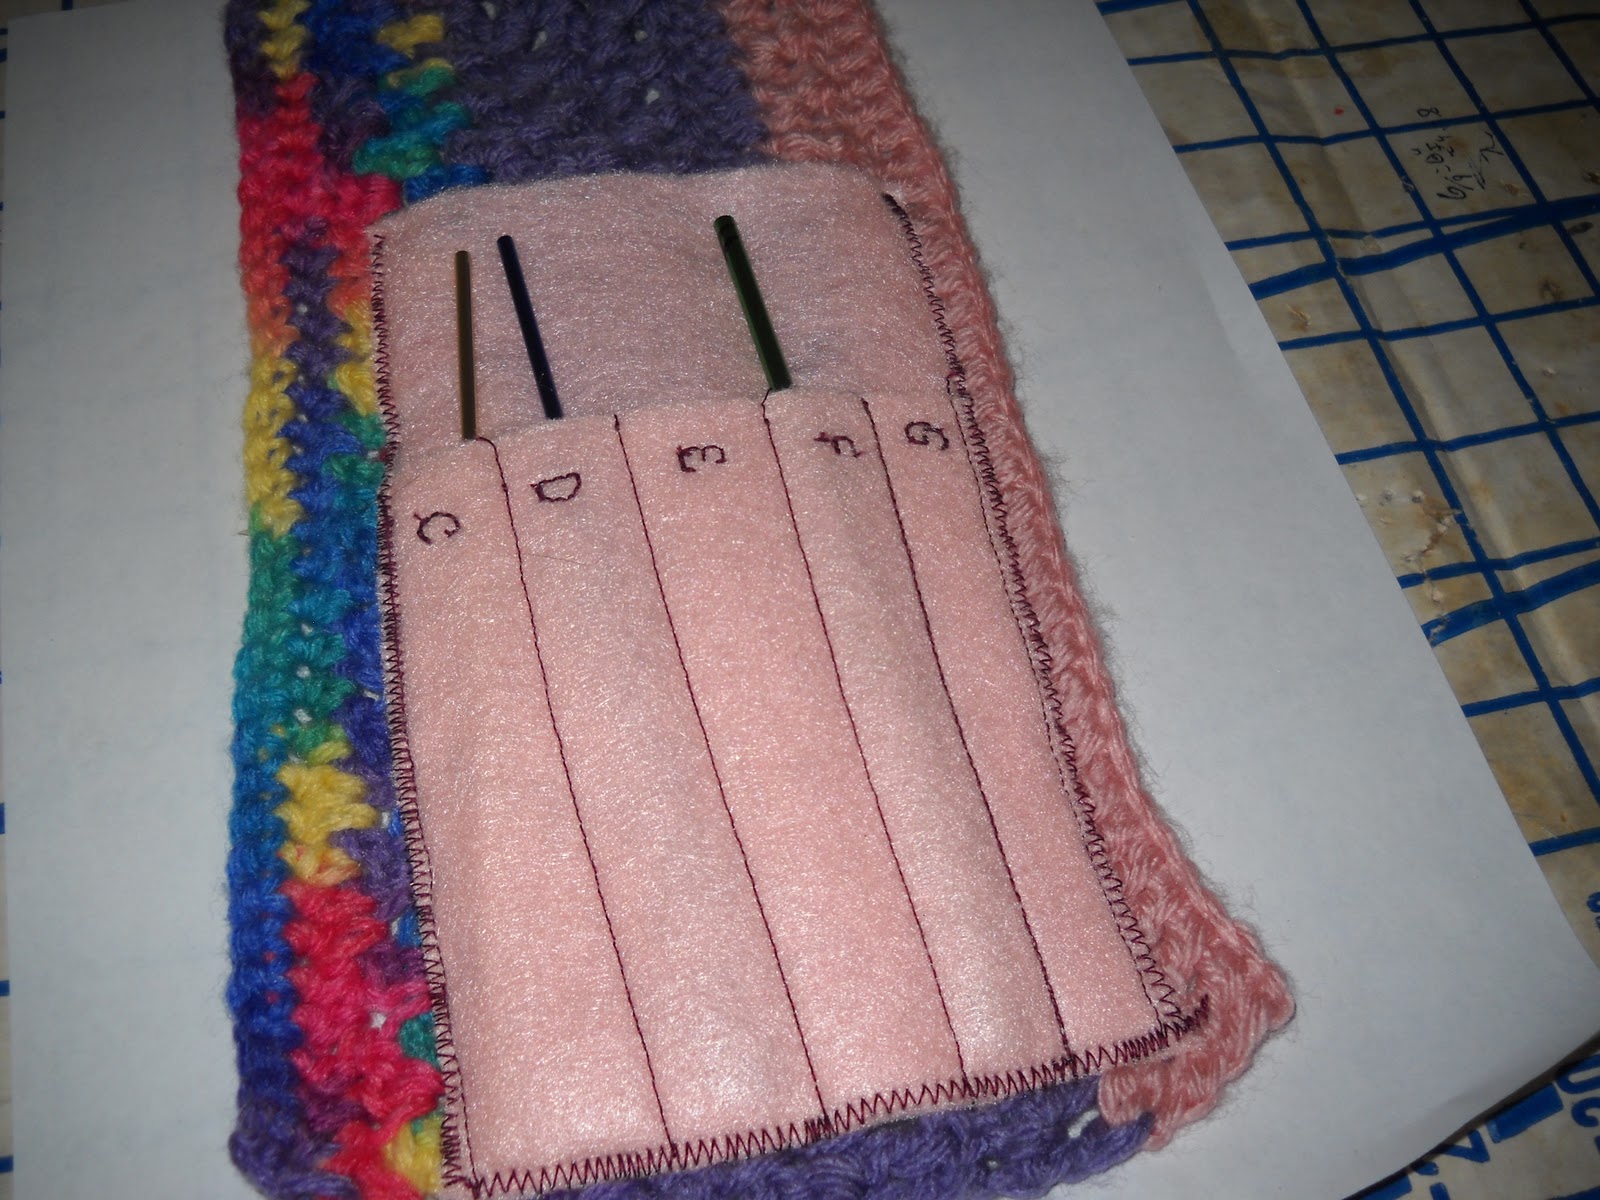
Yarn, this time. Here is a little holder I made for some of my crochet hooks. I'll make another for the larger hooks someday (and probably line up the felt pocket a little better!) I did not sew across the top of the inside felt piece. I think it would be a good place to store a small ruler. Buttons were an option, as well, but since I crochet a lot I figured I'd just do a fold-over. Really, this is no more than a long rectangle that was a great way to get rid of some of the dinky little hanks of yarn that aren't good for much else but scrap projects! (I also got the use the lettering feature on my sewing machine.)

Monday, January 23, 2012

Patches

I'm not a quilter (although I've tried) but I think patching scraps of fabric together is a great way to 'use up and make do.' It's fun, too, like putting a puzzle together.

Here are 3 different pieces I made. I pretty much just cut (or tear) pieces to fit against each other and see what I come up with. The one in the front that is mostly pink actually has a back on it. It will either become a small pillow or I'll make it a placemat. It's hard to see the striped piece, but it has 7 different colored strips and is 24 inches long. 

Hmmm, now that I'm looking at the one that is mostly blue, I think I will try to make it a full yard and use it for a project from my 'One Yard Wonders' book!

Friday, January 20, 2012

A laundry bag

I made this laundry bag based on a design from "One Yard Wonders." It isn't exactly like theirs, since I didn't have a full yard of the blue and white fabric, but I like the denim bottom half. I think it makes it sturdier, anyway. Not that it needs to be sturdy--I have it hanging on the back of the bathroom door and it will hold my socks and underwear. It was another good way to get rid of fabric, as well!

The circular opening is cut using a dinner plate for a template. I used a smaller dish but I still think it is too big. But it does make it easier to throw things inside!

Wednesday, January 18, 2012

Scrap busting

I have decided I really need to use up some of the infinite amount of scrap fabrics, yarns, buttons, etc. I have. Here are two little purses I've made. The red one is from a pattern (link below) and the blue/brown one is one I did freehand. Both went together pretty easily so I'll be making more of them.

You're supposed to use a snap set on the red wallet, which kind of folds in on itself, but I don't have one so I just made a buttonhole. (I'd use a smaller button for the next one I make, though.) Here is the link:

http://sewtimeless.net/?p=502

Tuesday, January 10, 2012

Paper Tray

I found a template for a cute paper tray. I printed it out on white cardstock. Then I flipped the paper over and printed on the back with a gingham pattern. I'm going to use this on my sewing table as a place to drop pins as I take them out while sewing. Much better than having them all over the floor!
I really love projects you can start and finish in a matter of minutes!


Here is the link to where you can find the template:

http://scjohnson.com/en/family/family-economics/12-01-03/Printable-Paper-Tray-Template.aspx

As far as the gingham, it came from a kit called Funky Spring that I believe came from this site:

http://saphirasworld.de/scrapdesign/category/freebies/

(Sorry, I downloaded it almost a year ago!)

Friday, December 30, 2011

My Christmas Dress

I'm sorry the picture is blurry and not full length, but this is the Christmas dress I made. I actually started it about 2 weeks before Christmas and (seriously) finished it Christmas Eve morning. It is red crepe-back satin with little silver flecks. It is a very simple princess-line dress with 3/4 sleeves and a v-neck. 
The thing that made me happy about it was that it fit without any alterations. This is the first time that's happened since I can remember. Losing 15 pounds has been a real ego-booster. Now I know I can pretty much make any pattern from this company (sorry I can't find the pattern) in this size (I'll admit it's 16, but in off-the-rack sizes that's like a 12 or 14) and have some success at it. I'd like to start making more of my own clothes again, and it will be nice not to be frustrated!

Wednesday, December 14, 2011

Fun with a Santa Beard

We went to get our tree tonight. I made a felt Santa beard for Katherine, who had a lot of fun with it! BTW, I have deleted the site where the pattern for this is, so if you know of it, please lmk and I will give credit and a link!

Saturday, November 12, 2011

Meet Mr. Giraffe!

Here is the giraffe I designed and made for my nephew. He came out pretty good, I think! Nice and goofy, perfect for a 7-year-old! I'm going to give it to him on Thanksgiving so it doesn't get 'mixed in' with the 8,000 Christmas gifts he'll probably get. I think he'll like it!

Friday, September 2, 2011

Wire hider


Or whatever you want to call it. The wire on my mouse is too long for my small desk, and was always getting 'caught.' So I made this big flower thing to hold some of it. The petals are sewn wrong sides together, then pinked. The middle of the flower is two pieces of felt, stuffed.

I cut enough petals to sew around one circle, each with a little pleat to give them 'shape.' Then I sewed a piece of elastic across the back of the second felt circle. I sewed this to the back of the flower, with a little stuffing inside.

You get the size of your flower by folding up your wire. You want the flower to hide it. The elastic holds the wire nicely.You  just have to let out however much wire works for you.


Saturday, August 27, 2011

Kind of Like Tetris


Did you ever want to use a piece of fabric for a project, but found it was not big enough? It might just be, if you play 'Tetris' with your pattern pieces!

Just cut them out in a single layer, rather than on doubled fabric. Cut one out (as you can see I did with the T-shaped pattern for the 'bucket' from the book I told you about in the previous post) and then flip it upside down and fit it onto the rest of the fabric! You could do this with any pattern, I think. Just don't forget the 2nd piece (although not in this case) is usually a 'mirror image.'

Hope everyone is staying safe as Irene rushes up the coast. We are as ready here at my house as we could ever be!

Friday, August 19, 2011

Straight Line Sewing

Even after 40 years of sewing, I'm always on the lookout for the easiest, but nicest-looking, projects. So when I read (somewhere) about a book called "Sewing in a Straight Line," I had to check it out. A brief sample on my NOOK and I knew I wanted it. I actually used some money from the gift cards to Barnes and Noble that my kids gave me for my birthday last January to buy the actual copy, not a NOOK download. I'm glad I did.

The author is Brett Bara. If you are lucky enough to get "Crochet Today" on public television, or if you've read "Crochet Today" magazine, you'll know who she is--the girl with blondish-brown hair and blue eyes. Who knew she was a sewist, too? And the book is true to its title: all straight lines!
The book if full of adorable and quick ideas, even clothing! Above is the "Clutter Busting Bucket Tote." Mine is a little saggier than the book's since I used what was on hand (she recommends canvas for the outside and I would guess the interfacing should be stiffer.) I'm using it to store my 'baby' yarns. (I should also point out that I just topstitched the straps to the outside. In the original, they are in between the layers.)

I also made a pillowcase, but you've seen enough of those without a picture.


Now I'm going to go check out her site: www.brettbara.com.


Saturday, August 13, 2011

A project for next summer


I've always wanted to make a "Disappearing 9-Patch" quilt, so when Joanne's had some bundled fabric on sale, I decided it was time. I chose patriotic prints, as you can see. I cut the 9 pieces of fabric (actually, there were 7 in the bundle, I think, and I added 2 more fat quarters) the same size then sewed  a big 9-patch quilt with them. (Not so big, really--it's about 60x60 inches.) It is nicely ironed at this point, and this is as far as I'm going this year with it.

I haven't taken my Fourth-of-July decor up into the attic yet, but I just thought I won't put this in with those items, after all. If I take it out before Memorial Day (when the first patriotic decor goes up) it will never be finished in time.

So I think I will put it in with my Easter/Spring decorations. Or maybe St. Patrick's Day...that will certainly give me plenty of time to work on it!


Thursday, August 11, 2011

Giraffe head


Yes, his ears are off-kilter. In the words of the great PeeWee Herman: "I meant to do that!"

Actually, I didn't. But sewing in the ears and those horns was a pain in the you-know-what, so they stay as they are. Nothing in nature is perfect, anyway.

I don't know if you can tell, but the back of the head is in two pieces. This creates a 'pocket' that the top of the neck will fit up into. (The neck isn't stuffed yet. I just tucked it in there to show what I mean.) I'll have to hand sew it shut, obviously. 

The google eyes I bought turned out to be way too big, so I'm going a size smaller next time I hit Michael's.

I would say Mr. Giraffe is 90% finished now! 


Wednesday, August 3, 2011

Apron, mostly done


The apron is done except for putting on some ties. As you can see, it's reversible. I used fancy stitching for the heart appliques because it shows up on the other side. It isn't very visible against the busy floral background, but it's there.
Can you see how the bias tape has different colors? (Can you also ignore my messy office?)

Tuesday, August 2, 2011

Apron part III or so


I think it's fun to make multi-colored bias tape with fabric scraps. This is the binding that goes around the apron. 
There are many excellent tutorials on line to make bias tape, especially the continuous kind. Mine is in sections, obviously. You simply fold your fabric into a triangle so that the lengthwise grain edge meets the crosswise edge. The slanted fold is now your bias. If you measure along this fold, remember to only  measure half the width of your tape! (When you open the fold out, obviously you'll now have the full size.) I measured an inch from the fold to get a 2-inch-wide strip.
Then, being somewhat impatient and non-fussy, I just used that 2-inch strip  to mark off more 2-inch strips. (I do like wide bias tape, LOL!) Then I just sewed the strips together. (I'm thinking of making templates for this in various widths out of cardboard.)
As you can see above, I folded the long strip in half and ironed it. Then I folded the raw edges into the center. (That step is obviously the top photo.)  The result you get is super-cute, original and colorful bias tape!
I took pictures of the apron, which is now finished except for the ties. I either have to plow through my fabric stash and find something to match or go out an buy ribbon. (For all the ribbon I have, nothing works with this, LOL!) Pictures tomorrow, I promise!